Overview
The Data Source Management module is a key part of GoWit’s integration platform that allows partners to configure and monitor how data is ingested. Each Data Source represents a specific data feed or API integration for an entity type (such as products or advertisers).
When you set up a data source, the system generates a unique identifier (a UUID) for it. This UUID acts as an integration key – it tags every incoming data batch so the platform can track its ingestion status and history.
In practice, the Data Source Management UI provides a centralized dashboard to view ingestion runs (whether feed fetches or API uploads) and their outcomes. This means you can easily see when the last sync happened, whether it succeeded or failed, and any errors that occurred, all in one place. Tracking ingestion status is essential for ensuring that your catalog data is up-to-date and for quickly spotting or diagnosing issues in the data import process.
Why UUIDs Matter
The Data Source UUID ties your data sync requests to the correct configuration. By including the UUID with each request, the GoWit platform knows exactly which data source (and which environment) the data belongs to, enabling proper logging and isolation.
This is especially crucial when you have multiple data sources or separate staging vs. production setups – the UUID ensures the right data goes to the right place and that you can monitor the status for each integration independently.
In short, Data Sources (with their UUIDs) give both you and GoWit visibility and control over the ingestion pipeline for your data.
Creating and Managing Data Sources
To start syncing data, you first need to create a Data Source via the GoWit Admin UI. This is typically done by an admin user in your organization’s GoWit console:
-
Navigate to Data Sources:
Log in to the GoWit Admin console and go to Dev. Tools → Data Sources. Here you’ll see a list of existing data sources (if any) and a button to create a new one. -
Create a New Data Source:
Click on Create New Data Source. You will be prompted to enter configuration details for the new source. Key settings include:- Name: A descriptive name for your data source (e.g. “Product Feed API” or “Advertiser Feed File”).
- Entity Type: Specify the entity this data source will handle – choose Product for product catalog data or Advertiser for advertiser account data. This selection defines the expected data schema and ensures the proper validation rules are applied.
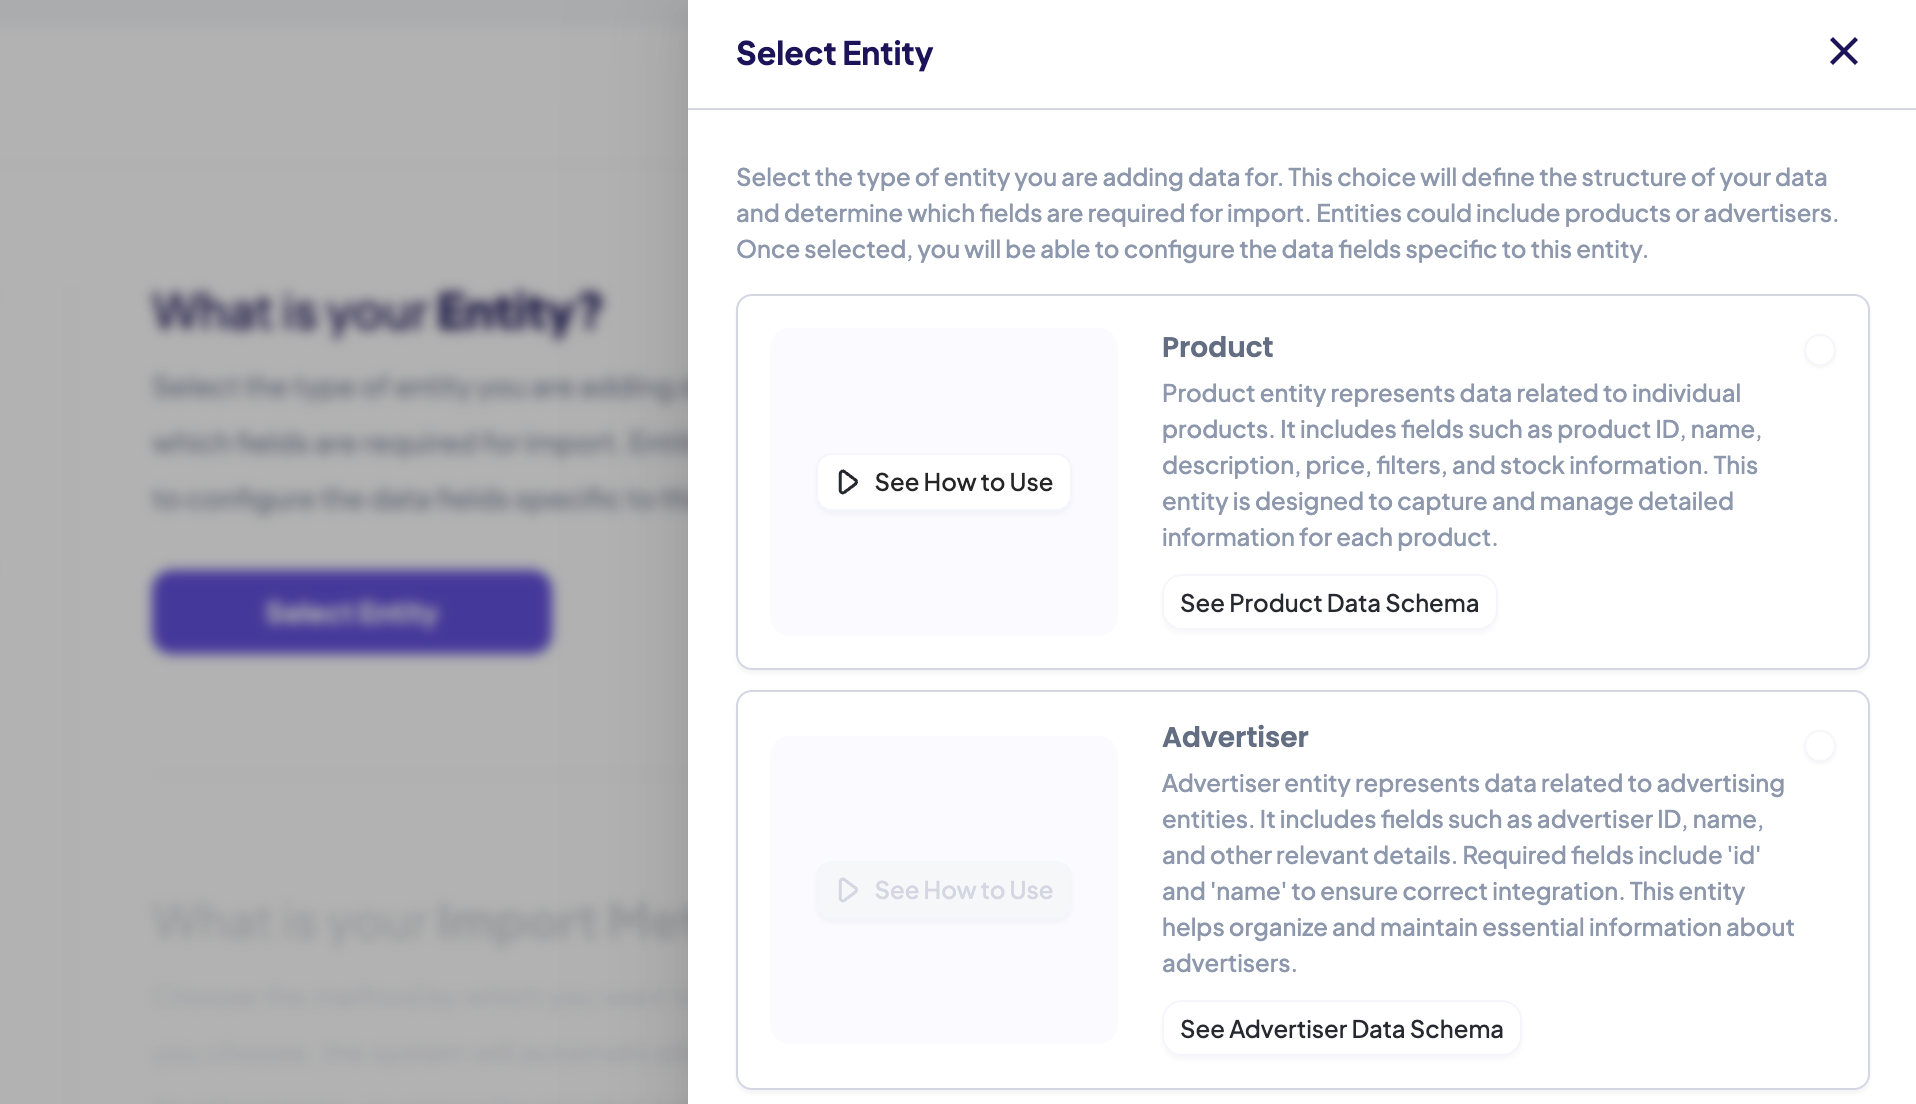
- Import Method: Choose how data will be imported. Options typically include API (for pushing data via API calls) or Feed File (for scheduled file fetches, e.g. Google or Meta product feed). For API integrations, select the appropriate “API” option; for file-based feeds, you might select the feed type and provide a URL or upload a file.
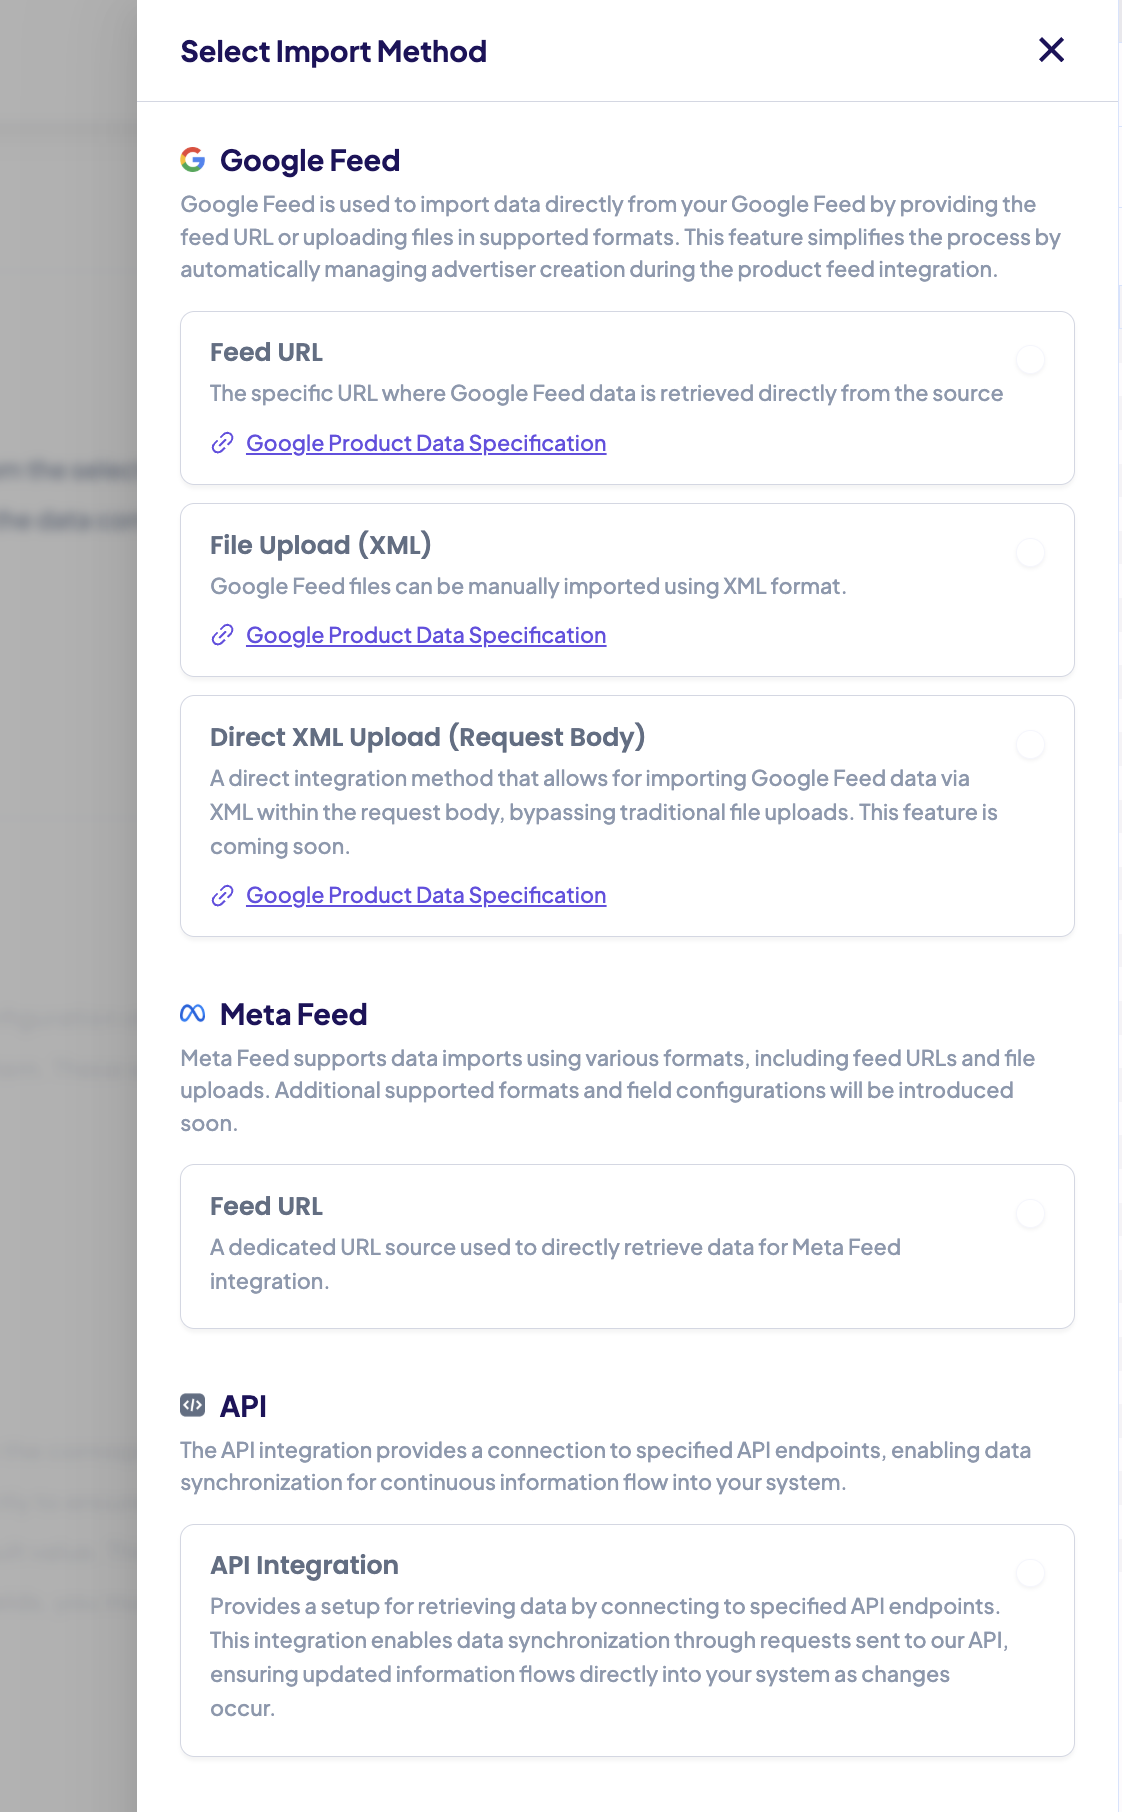
- Configuration Details: Depending on the import method, additional fields appear. For a feed, you’ll provide the feed URL and set a schedule interval (the fetch frequency, e.g. hourly or daily). You may also map fields if the feed’s columns need mapping to GoWit’s standard fields (a mapping UI or “Data Maps” can be configured here). For API-type data sources, no feed URL is needed – you are indicating that data will come via API calls.
-
Save and Obtain the UUID:
After filling in the details, save the new data source. The platform will create the data source entry and generate a unique UUID for it. You can find this UUID in the data source’s details page in the admin UI – it may be labeled as “UUID” or “Integration ID”. This is the identifier you’ll use in API requests. Copy this UUID for use in your integration code.
Using Data-Source-UUID in Requests
For API integrations, every request you send to GoWit’s catalog endpoints should include the Data Source’s UUID in the header. GoWit expects a custom HTTP header named Data-Source-UUID on each integration request. This header’s value is the UUID obtained from the Admin UI when you created the data source.
Including this is crucial: it links your request to the correct data source configuration and enables the platform to log the operation under that data source’s history.
Entity-Specific Examples
The header is sent like any standard HTTP header. For example, using cURL, an API call to create/update products with the UUID would look like:
Advertiser
curl --location 'https:<your-base-url>/api/integration/advertisers'
--header 'Authorization: <your-api-key>'
--header 'Data-Source-UUID: <data-source-uuid-of-the-advertiser-entity>'
--header 'Content-Type: application/json'
--data '{
    "marketplace_id": <your_marketplace_id>,
    "advertisers": [
        {
            "status": "ACTIVE",
            "name": "Sample Advertiser",
            "email": "sample_advertiser@gowit.com",
            "id": "56789" // Unique identifier for the advertiser
        },
        {
            "status": "ACTIVE",
            "name": "Another Advertiser",
            "email": "another_advertiser@gowit.com",
            "id": "98765" // Unique identifier for the advertiser
        }
    ]
}'
Product
curl --location 'https:<your-base-url>/api/integration/products'
--header 'Authorization: <your-api-key>'
--header 'Data-Source-UUID: <data-source-uuid-of-the-product-entity>'
--header 'Content-Type: application/json'
--data '{
    "marketplace_id": <your_marketplace_id>,
    "products": [
        {
            "id": "12345", // Unique identifier for the product
            "name": "Sample Product Alpha",
            "advertiser_id": "56789", // The unique ID of the advertiser associated with this product. Use the ID created when setting up advertisers on the platform. If the advertiser does not exist, you can use an ID, but products cannot be created until the advertiser exists.
            "image_url": "https://example.com/images/sample-alpha.jpg",
            "description": "This is a placeholder product for API testing purposes.",
            "price": 50.00,
            "stock": 100,
            "rating": 4.5,
            "buybox": false,
            "brand": "TestBrand",
            "retailer_taxonomy": "SampleCategory>Subcategory",
            "status": "DELETED"
        },
        {
            "id": "67890", // Unique identifier for the advertiser
            "name": "Sample Product Beta",
            "advertiser_id": "98765", // The unique ID of the advertiser associated with this product. Use the ID created when setting up advertisers on the platform. If the advertiser does not exist, you can use an ID, but products cannot be created until the advertiser exists.
            "image_url": "https://example.com/images/sample-beta.jpg",
            "description": "Another placeholder product to validate API functionality.",
            "price": 75.00,
            "stock": 50,
            "rating": 4.0,
            "buybox": true,
            "brand": "TestBrand",
            "retailer_taxonomy": "SampleCategory>AnotherSubcategory",
            "status": "ACTIVE"
        }
    ]
}'
Impression
curl --location 'https:<your-base-url>/server/events'
--header 'Authorization: <your-api-key>'
--header 'Data-Source-UUID: <data-source-uuid-of-the-impression-entity>'
--header 'Content-Type: application/json'
--data '{
    "marketplace_id": <your_marketplace_id>,
    "event_type": "impression",
    "ad_id": "4b702dcc-2ea5-495b-adc3-66cf0b44f039", // The unique ID of the advertisement related to this event.
    "session_id": "ec07083a-8bf8"
}'
Click
curl --location 'https:<your-base-url>/server/events'
--header 'Authorization: <your-api-key>'
--header 'Data-Source-UUID: <data-source-uuid-of-the-click-entity>'
--header 'Content-Type: application/json'
--data '{
    "marketplace_id": <your_marketplace_id>,
    "event_type": "click",
    "ad_id": "4b702dcc-2ea5-495b-adc3-66cf0b44f039", // The unique ID of the advertisement related to this event.
    "session_id": "ec07083a-8bf8"
}'
Sale
curl --location 'https:<your-base-url>/server/events'
--header 'Authorization: <your-api-key>'
--header 'Data-Source-UUID: <data-source-uuid-of-the-sale-entity>'
--header 'Content-Type: application/json'
--data '{
     "marketplace_id": <your_marketplace_id>,
     "event_type": "sale",
     "sales": [
         {
             "advertiser_id": "56789", // The unique ID of the advertiser associated with this product. Use the ID you used when setting up advertisers on the platform. If the advertiser does not exist, you can use an ID, but products cannot be created until the advertiser exists.
             "quantity": 2,
             "unit_price": 100,
             "product_id": "12345" // The unique ID of the purchased product. Use the ID you used when setting up products on the platform. If the product does not exist, you can use an ID, but sales cannot be created until the product exists.
         }
     ],
     "session_id": "ec07083a-8bf8"
}'
In these examples, replace <YOUR_API_TOKEN> with your authentication token and <YOUR_DATA_SOURCE_UUID> with the actual UUID (a GUID string like 550e8400-e29b-41d4-a716-446655440000). The Data-Source-UUID header can be included in all integration endpoints (e.g., for products, advertisers, clicks). The request payload includes the data. The marketplace_id identifies your account or network within GoWit’s system (ensure you use the correct ID provided to you).
When the GoWit API receives such a request, it will look up the provided UUID. If it doesn’t match any known data source, the API will respond with an error indicating the data source was not found. This typically means the UUID is wrong (typo or missing) or you’re using the wrong environment’s UUID.
If the data source exists but was not set up for API (for instance, a feed-only data source), the API will also reject the call with a message like “This data source is not an API type data source”. Therefore, always use the correct UUID for the data source that was configured for API integration.
Staging vs. Production UUIDs
It’s important to understand that UUIDs are environment-specific. Your staging (test) environment and production environment have separate databases and thus separate data source records.
A UUID generated in the staging admin UI will not be recognized in the production API, and vice versa. In practice, you should create parallel data sources in each environment (e.g., “Product API – Staging” and “Product API – Production”) and use the respective UUID for calls to that environment’s API.
Never mix them up:
- Use the staging data source UUID when sending requests to the staging/sandbox API endpoint.
- Use the production data source UUID when sending requests to the live production API.
Mixing them will result in “Data Source not found” errors or other failures, since a production system won’t find a staging UUID in its records.
Keep your configuration files or environment variables updated so that when you promote your integration from UAT to production, you swap in the production UUID (along with the production base URL and API keys). This ensures a smooth transition without authentication or logging issues.